Measure Lens Resolution without a Test Chart
- Ed Dozier
- Jun 14, 2024
- 5 min read
If you’re interested in seeing how sharp your camera lens is, but you don’t have a test chart to use, read on. The free program MTFMapper has a feature called “Open with manual edge selection”. Using this program option, you’re given the freedom to select anything in a photograph and potentially use it to measure your lens resolution.
The excellent MTFMapper program is authored by Frans van den Bergh, and can be downloaded from this site. MTFMapper has been used by NASA to measure lenses that are now in use on the planet Mars.
There are rules (as always) for what you can use as subjects for testing lens resolution. For instance, you need a dark, straight, slanted edge against a light featureless background. The straight edges are preferably black, but if you have a strong backlight to get a silhouette effect, then the object with the edges doesn’t have to be any particular color.
The MTFMapper program doesn’t like either vertical or horizontal edges, nor does it like edges at 45 degrees, due to the way the program’s mathematics work. To abide by this rule, all you need to do is slightly rotate your camera or your subject before photographing it.
You’ll get different resolution measurements of the same target, depending upon which angle the target edge is at. Almost all lenses resolve differently in the sagittal (spokes away from the lens center) and meridional (perpendicular to sagittal) directions. Rotate the target or camera to enable getting the kind of measurement (sagittal/meridional) you want.
To get the best results from this program, you’ll want to shoot your photographs in raw format (definitely NOT in jpeg format). I have some raw-format camera files that MTFMmapper can’t understand, because it uses the library called LibRaw to decode the raw files. My Nikon Z8 and Z9 ‘high efficiency’ compressed raw files can’t be used as-is by MTFMapper, but all I have to do is convert them into the DNG format. The MTFMapper program (using the Libraw library) understands DNG, and you can use the free Adobe DNG Converter program to convert nearly any raw format into DNG.

Resolution measurement of a 500mm lens with 1.4X teleconverter
As shown above, the MTFMapper program was able to measure the resolution at the edge of a clamp I attached to a fence. It got a resolution measurement of MTF50 50.3 lp/mm, which is the same as 2404 l/ph (lines per picture height). I used my Nikkor 500mm PF with a 1.4X teleconverter on my Nikon Z8 to take this 700mm f/8 shot from 58 feet (17.7m) away.
I wasn’t able to set up my resolution test chart this far away, so I improvised with a clamp to get to the desired distance. I rotated the lens/camera combination so that the clamp wasn’t pointing quite vertical. I made sure that the background was much lighter than the dark clamp, and the background is smooth and out of focus. This clamp is large enough to make it easy to place the camera focus point on it, even at long distances.
If the camera I’m using has it, I like to use the feature called “Pinpoint focus” to get the most accurate focus. Even the slightest focus error will cause a drastic drop in the resolution measurement. Pinpoint focus also helps ensure that the camera isn’t focusing on the wrong thing when I’m far from the target.

The whole field of view for my test setup
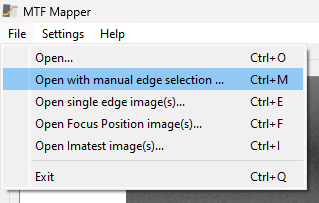
MTFMapper program option to pick edge(s)
As shown above, I used the File | Open with manual edge selection… menu option to open up a suitable raw-format photograph.

Select an edge to measure
I mouse-clicked two locations on the edge that I wanted to measure. After clicking the first edge location (little orange circle above), I watched the histogram display (lower left of dialog) while I selected the second location (mouse move) to complete the edge selection. The histogram feedback helps you ensure that you get a clean selection that can be properly analyzed. If you decide to change your mind after selecting an edge, then you can click Clear ROIs (Region Of Interest) and select another edge location. It’s also possible to select multiple edges (regions) to analyze.
You can fine-tune your edge selection by mouse-dragging the little orange circle to another location after your initial selection. Just watch the histogram while dragging the orange circle to optimize your selection.

Slightly different location, different measurement
I re-measured the edge, using a different section of a shorter length, and got a different answer. Here, I got an MTF50 resolution measurement of 55.7 lp/mm (2663 l/ph). This probably means that the edge I’m measuring looks more consistent over a short selection length of the target. This is a pretty cheap clamp, and not a super-precision edge. Multiple short regions could have been selected along the edge to compare them, too.
After you have selected a suitable edge, then click Accept and allow the program to calculate the resolution at your selected edge(s). Make sure that you set up the correct options for your camera sensor (under Settings) before doing the manual edge selection, including the sensor pixel size.

Selecting lots of edges of a printed resolution chart
The screen shot above shows how I have selected numerous places in a photo of a test chart to analyze. Some of these selections are poor/illegal, to demonstrate what kind of feedback will result.
If you select an unsuitable edge for the program to analyze, you might get an error message when you request that the program begins the analysis. You’ll either need to select another location or another subject to measure.

Program feedback
Successful measurements (looking at the annotated results) are displayed in cyan. Unreliable answers (45-degree sloped edges) are displayed in yellow, and failed answers (vertical or horizontal edges) are shown in red. I set up my program options to display the answers in MTF50 lp/mm units.

Another kind of target
I sometimes use a razor blade as a target when I’m shooting at fairly close distances. I use an LED light to back-light the blade, so it shows up as a silhouette. In the shot above, I requested measurements on 3 sides of the blade. If I’m far enough away, it doesn’t matter if I select the sharpened razor edge or another edge. I placed a white background directly behind the blade to get good contrast.

Using a precision edge from a caliper (indoors)
I have a handy little dual-clamp device with a pair of adjustable alligator clips that I used to hold a precision caliper. The program feedback (under the histogram) indicated that the caliper’s edge selection was 114.5 pixels. The minimum allowed selection length is about 40 pixels, but I’d recommend always using more than this.

The annotated resolution result
Again, when I select shorter sections of the edge I almost always get a higher resolution reading since the program sees less overall edge variation. The MTF50 result here was 58.2 lp/mm (2782 l/ph), or within about 4 percent of the reading from my Workpro clamp outdoors with the same 700mm lens/teleconverter combination. This shot was done at 40 feet (12.2m). The caliper’s edge is un-coated stainless steel, but I set up a strong backlight to get a good silhouette.
Whatever target you try to use for getting resolution measurements, the choice had better be carefully thought out. Rough or crooked edges just won’t cut it. Let the program’s histogram feedback be your guide for selecting a good edge. As always, this is a ‘garbage in garbage out’ scenario.
Using lone edges like this won’t give you the comprehensive results that a proper resolution chart will, but if all you want is a handful of measurements then this should work fine. This is also a good way to compare a printed test chart’s quality against a precision edge.
Summary
It's hard to beat free. If you can locate a suitable subject with a good edge on it, you should be able to get lens resolution measurements. As I have said many times on my site, thanks again to that very clever Frans van den Bergh!


Comments